Author: Christopher Parker (Deputy Chief Fisheries Officer)
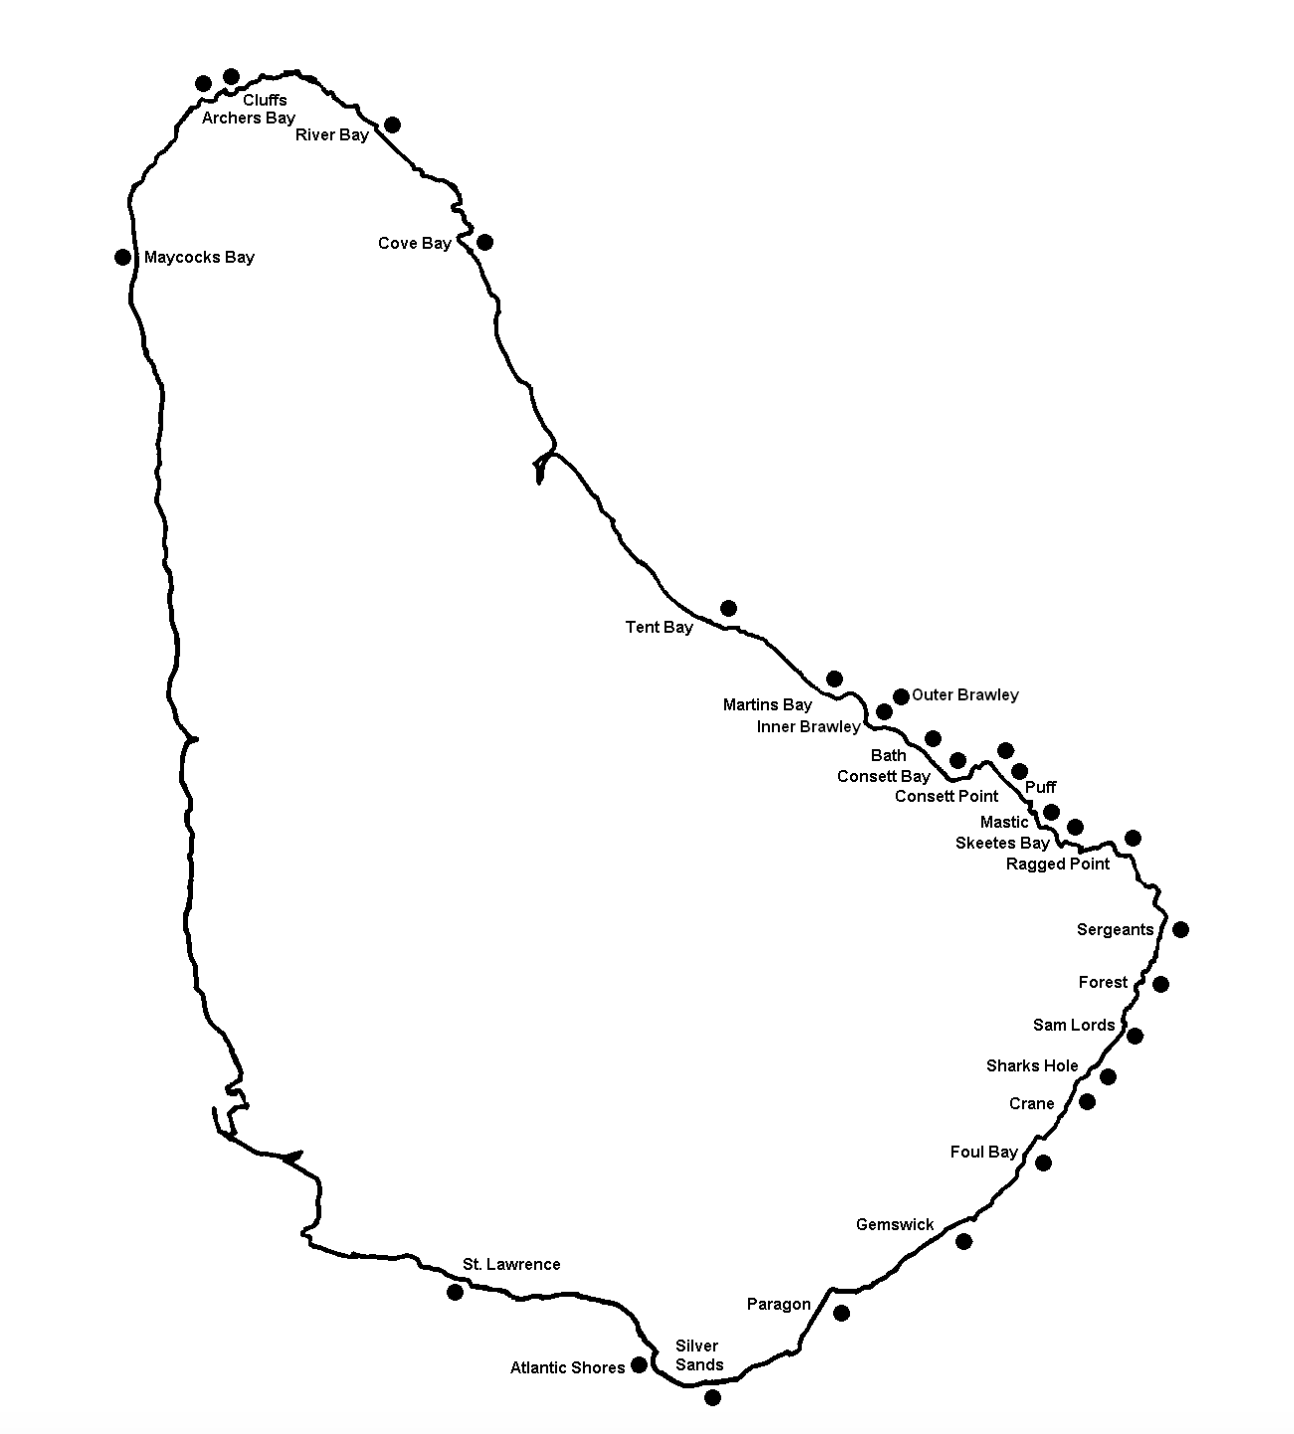
Information on the sea egg stock is obtained by surveys using standard sampling techniques at a number of index sites around the island. The index sites are all areas that historically supported sea eggs and were popular harvesting areas (see map below). The same specific study locations at each index site (GPS coordinates recorded but not disclosed here) are revisited each year and the following information collected by groups of sea egg divers familiar with the respective sites and trained in the data collection methodologies outlined in this booklet. It should be noted that all the index sites might not be surveyed in any one year.
Estimating the density of sea eggs
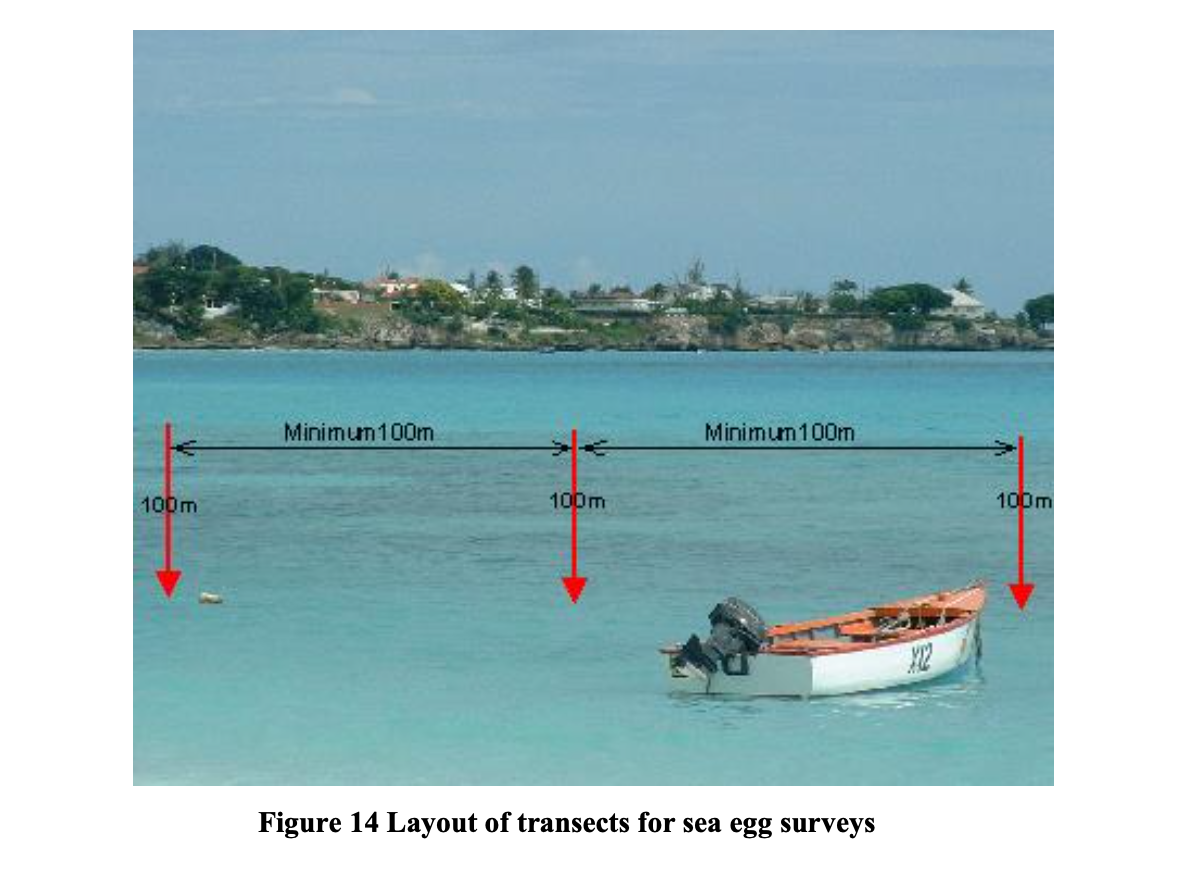
The first step in estimating the density of sea eggs at a site is to position the sampling transects. A sampling transect may be considered as simply a straight path (represented by a straight line in the figure below) along which the sampling will actually be conducted. Sampling transects were traditionally marked out by laying a rope over the sea floor.
However, in this sampling program the transects are simply imaginary straight lines set as shown in figure 14.
1. Position the first transect to run perpendicular to the shoreline within the prescribed survey site.
2. The other transect(s) should be run parallel to the first with a space of at least 100 m between each.
3. The exact area to be surveyed should therefore be at least 100 m wide and 200 m long to allow the three transects as shown in figure 11 to be set.
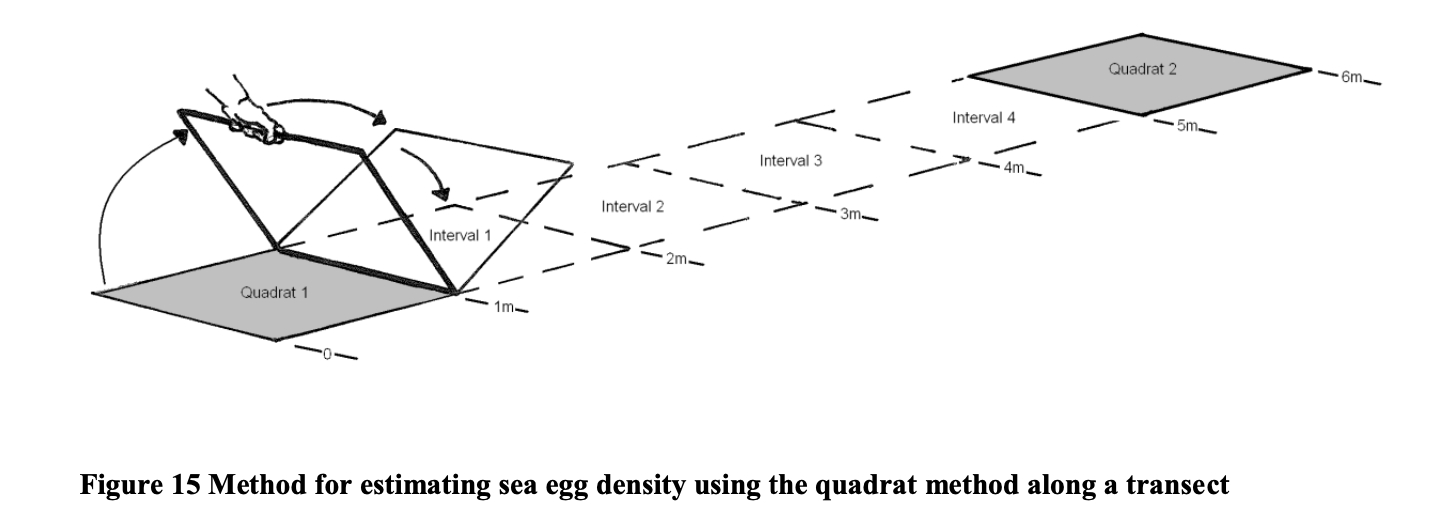
Actual counts of sea eggs to determine densities are taken within twenty (20) 1m x 1m square sampling areas called quadrats along each transect. The area of the sampling quadrat is demarcated using a metal square frame with each side measuring 1m.
- Place the 1m x 1m metal quadrat frame at the first interval at one end of the transect such that the leading side of the quadrat lies perpendicular to the transect or (parallel to the shoreline) (figure 15).
- Count all of the sea eggs found within the area of sea floor falling within the quadrat and record the number on the slates provided.
- After counting the sea eggs in the first quadrat flip the metal frame end over end 5 times. This will bring the quadrat to rest 4 meters away from the first location (grey area labeled as Quadrat 2 in figure 15).
- As before count all the sea eggs within this quadrat and record the number on the slate.
- Repeat steps 3-4 until 20 quadrats along the transect have been censused. Note that by using this method the last quadrat counted would be at the 95m mark on the transect.
- Repeat this procedure along each transect.
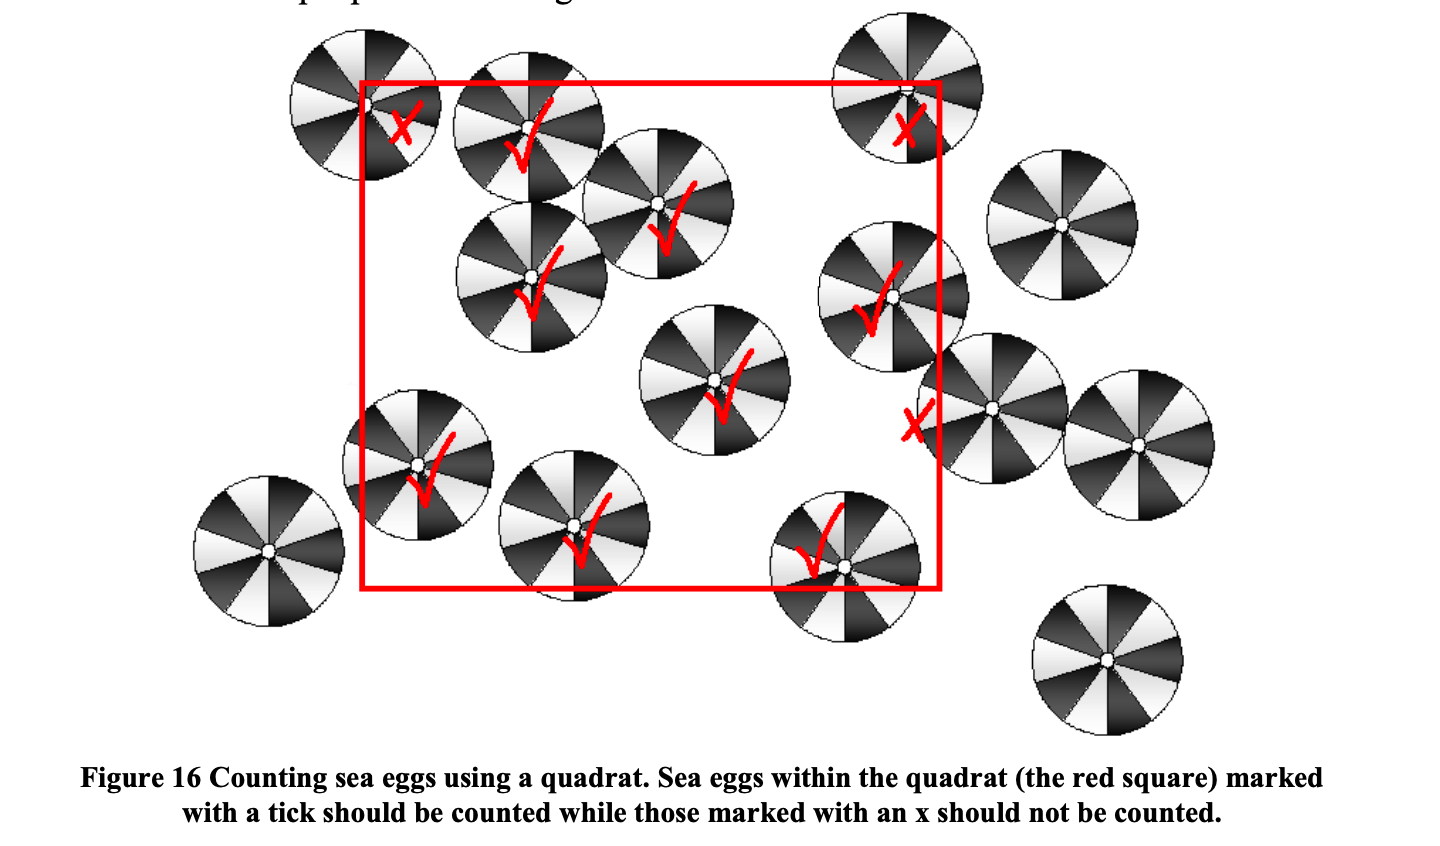
Many of the sea eggs encountered during the census will probably fall along the boundary of the line of the quadrat raising the question of if they should be included in the count for the quadrat.
The standard criterion to be used is that if more than a half of the animal lies within the quadrat it should be counted otherwise it should be excluded. Using this criterion there are eight (8) sea eggs within the quadrat illustrated in the example presented in figure 16.
The size structure of the population
Assessing the size structure of the population involves measuring a sample number of sea eggs chosen randomly from each index site.
- Lay the 1m x 1m metal frame in an area close to or along the survey transect after the process for counting the sea eggs in the area has been completed.
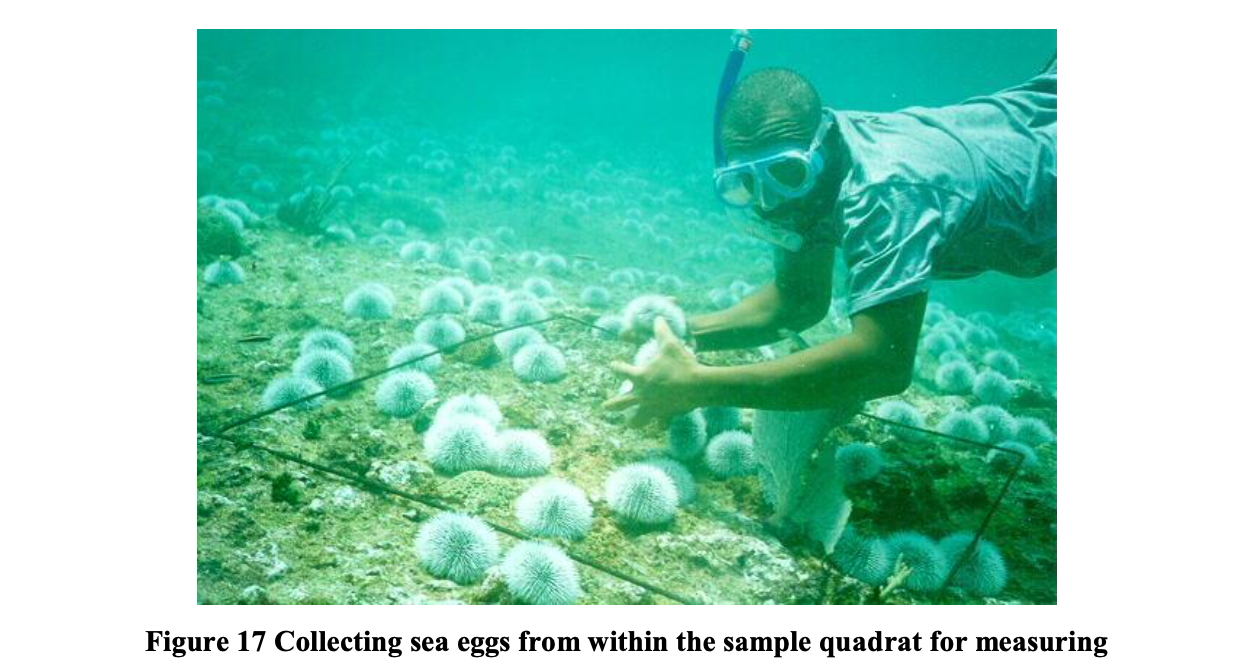
- Measure and record the lengths of all the sea eggs encountered within the quadrat making sure that to carefully examine the area for the presence of juvenile animals. Sea eggs may be collected from the sample areas and measured in the boat but for this they must be kept cool preferably by placing them in a cooler (Figure 17). Once the measuring process is completed the sea eggs must be returned to the site as soon as possible but within an hour of removal from the water.
- Flip the metal frame a few times (the number is not as important as for the density surveys) and repeat the process of searching and measuring every sea egg within the quadrat.
- Repeat this process until at least 100 sea eggs have been measured (irrespective of size i.e. do not deliberately try to target a specific size range)
5 Measure all the sea eggs in the quadrat in the which the 100th sea egg has been found even though this will give a total sample size greater than 100.
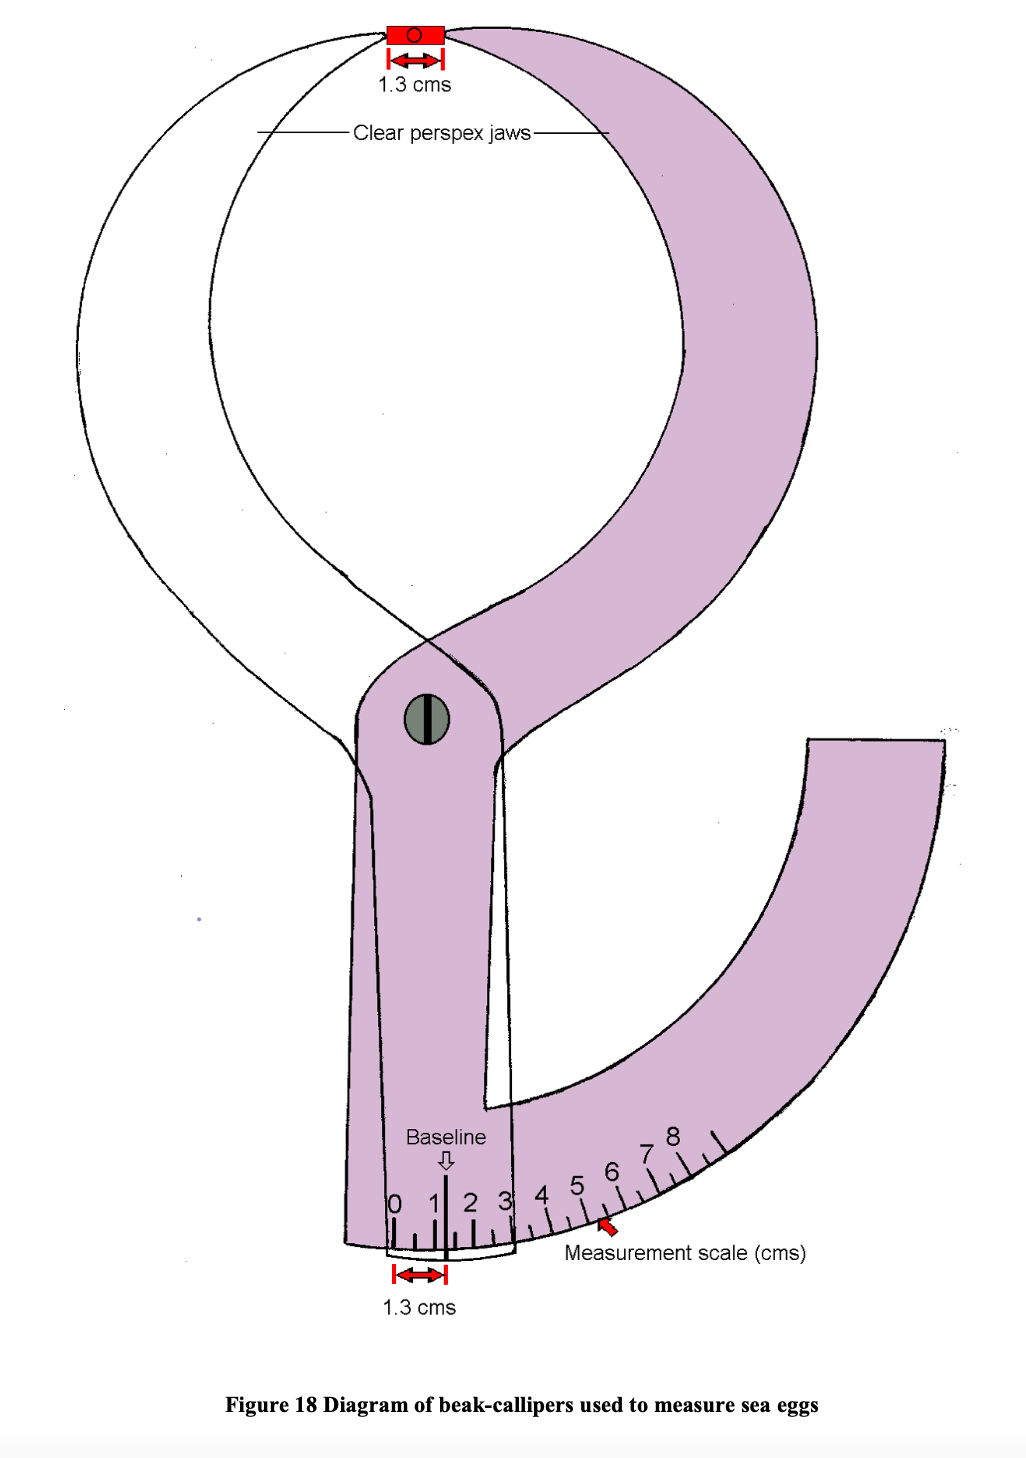
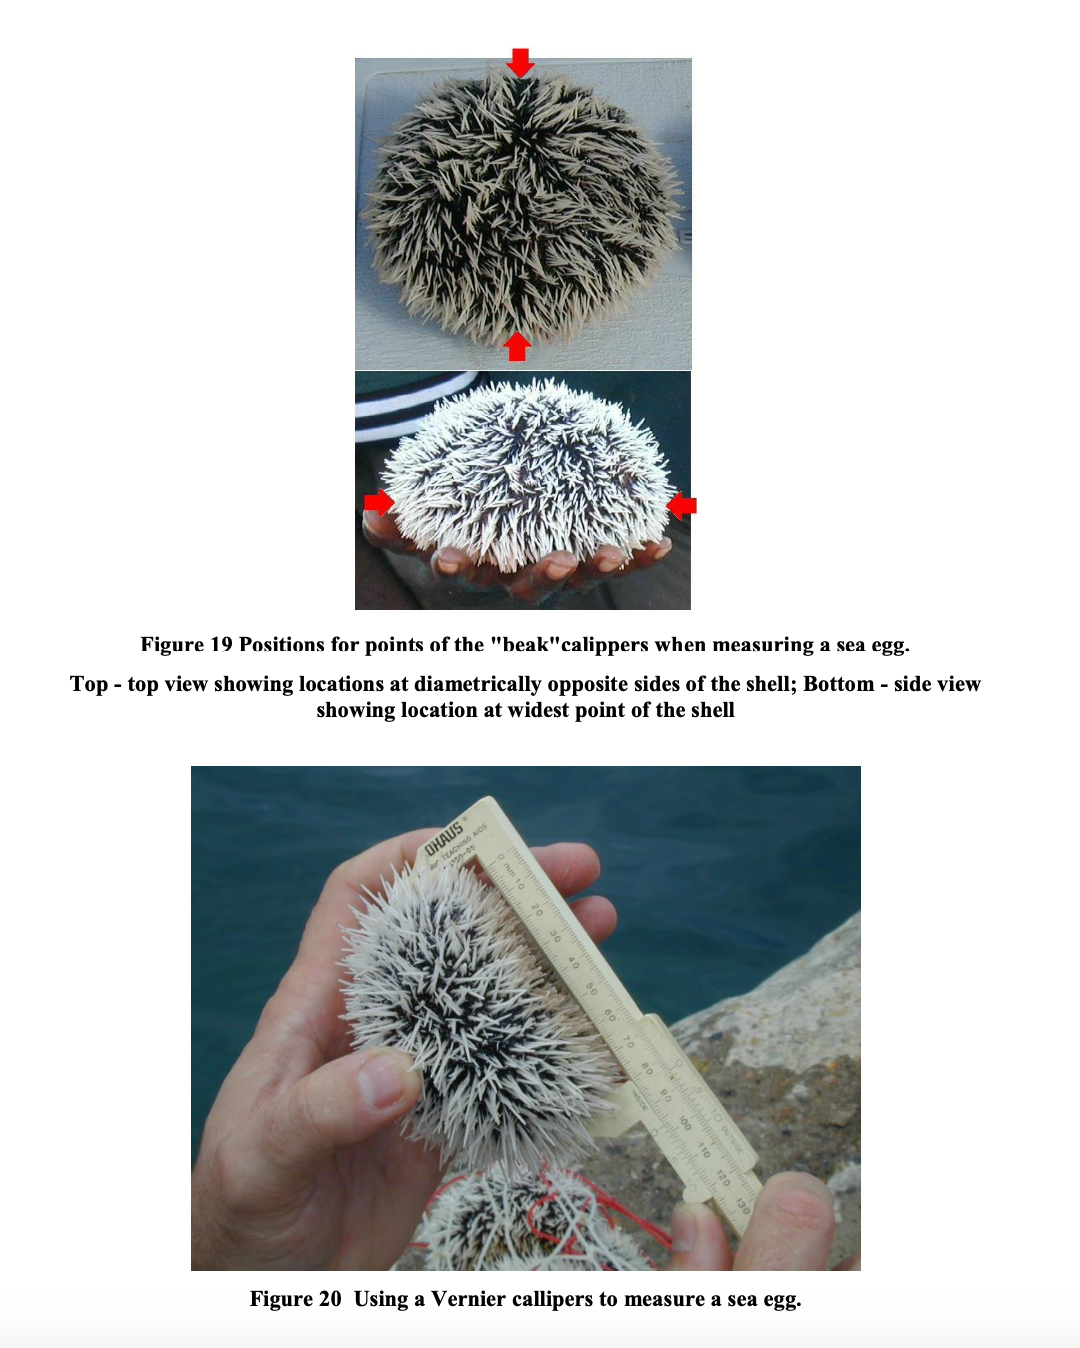
The maximum width of the sea egg is obtained using a measuring calliper. There are two types of measuring calliper that can be used for this purpose. Both have their advantages and disadvantages. The first calliper is custom designed for use with sea eggs and has curved tapering ends that can get between the spines of the urchin without hurting the animal. The urchin is placed between the pointed jaws of the callipers and the size read from an arc shaped measuring scale at the other end of the instrument (Figure 18). The measurement scale is calibrated in 1⁄2 cm (5 mm) intervals with each whole cm numbered. Measurements to the nearest millimetre are estimated. For example, in figure 18 the object is estimated to be 1.3 cm in width as it falls between the 1 cm and 1.5 cm interval and is closer to the 1.5 mark. In addition to the relatively low measurement resolution, a disadvantage of using this measuring device is the difficulty in positioning the ends of the callipers such that they lie at the widest point on the shell. That point is located at diametrically opposite sides of the animals (when viewed from above) and about two thirds down the body when the animal is viewed from the side (Figure 19).
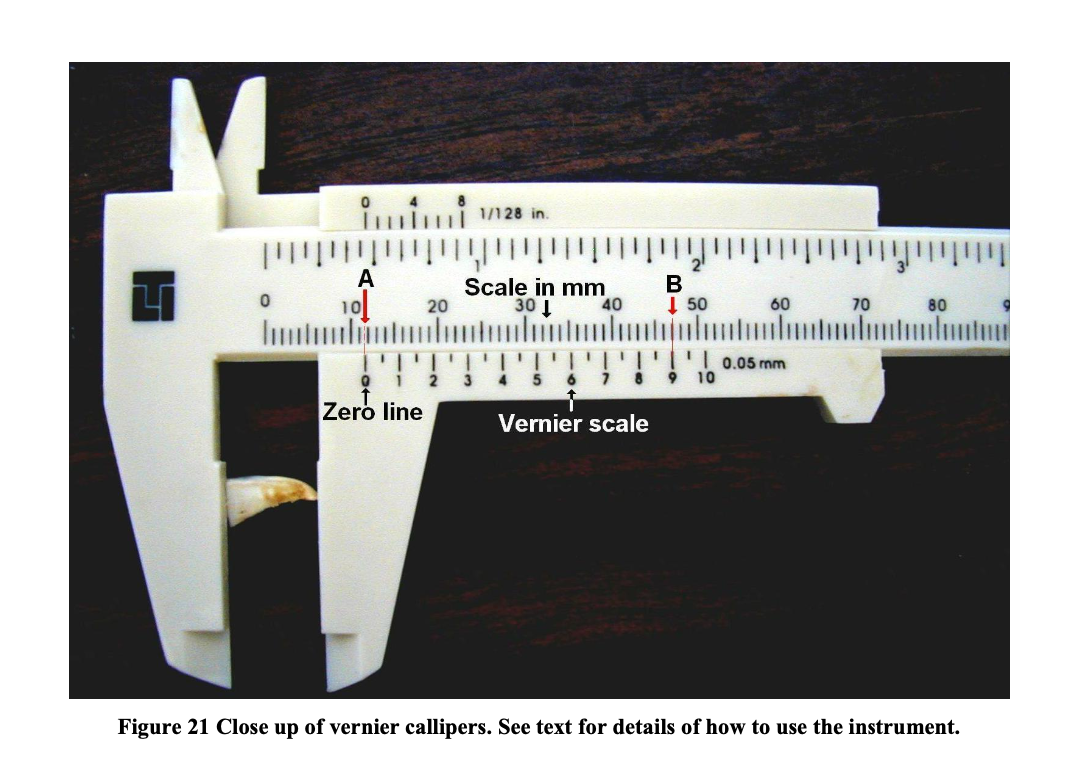
The second type of calliper available is the commercially produced sliding vernier calliper. With this calliper, the urchin is placed between two straight jaws one of which is fixed and the other is moveable. The calliper jaws are tightened around the animal at its widest point by sliding the moveable jaw (Figure 20). Two measurement scales (one calibrated in inches and the other in mm) are drawn along a straight arm that extends from fixed jaw (Figure 21). Small scales (the vernier) are drawn on smaller arms attached to the moveable jaw. For the purposes of this exercise the scale calibrated in inches (at the top of the instrument) may be ignored. As the jaw is closed the two scales (the fixed scale and corresponding vernier scale) are run along each other side by side. The first part of the measurement is read first at the point where the zero mark on the vernier scale aligns with the measurement scale (A in the diagram). In the example this lies between 11 and 12 mm. The second part of the measurement is more difficult to read and is where any of the intervals on the vernier scale lines up best with any of the intervals on the main measurement scale. In this case the best alignment is between interval “9” on the vernier scale with the mark for “47 mm” on the main scale. It is the number of the interval on the vernier that is used now i.e. 9. As such the measurement is 11.9 mm.
Commercially produced Vernier callipers are probably calibrated more accurately than the “home-made” beak callipers and because of their long arms it is not necessary to locate the widest point of the test from the side by eye. However, the major disadvantage of using the Vernier calliper to measure sea urchins is that the spines of the animal usually prevent the calliper jaws from making good contact with the shell thus making the measurement inaccurate. Overall therefore the “beak” calliper is recommended for use in the sea egg field studies for a number of reasons including the relative ease of its use in the field, the low risk of hurting the animal and the level of accuracy is sufficient for the type of information being gathered in the field surveys. The Vernier calliper is reserved for use when very accurate measurements are needed such as in GSI studies. In these cases, the animals are going to be killed anyway and the spines are first removed from the areas to be measured.
Gonadosomatic indices
The importance of monitoring the size and condition of the gonads (sex glands) of the sea eggs has already been explained in section 1. As previously explained in chapter 1, gonad size is governed by a number of factors including the age and size of the animals. It is therefore essential that the size of the animal’s body be taken into account whencomparing gonad size. In studies of this nature this gonad size to body size relationship is taken into account by calculating a ratio known as the gonadosomatic (soma means body) index (GSI) for each urchin. These ratios may then be compared with those of other sea eggs. The gonadosomatic ratio is simply gonad size (weight or volume) divided by body size (weight or volume), which gives a value that represents the gonad size for a standard unit of body size. Using certain formulas (Parker, 2005) that will not be discussed here, it is possible to estimate the volume and thus weight of a sea egg based on its height and diameter. This is a useful check for accuracy as many factors involved in the sampling process can affect the whole weight of a sea egg. Any major discrepancies between the recorded weight and the expected weight based on the size of the animal signal that an error has occurred in the weighing process. The procedure for estimating the gonadosomatic indices is as follows.
- Once collected from the field keep sea eggs out of water but in a cool environment. This reduces the chances of the animals spawning. They can survive in this state for as long as two hours.
- Once in the lab note which, if any, of the animals have spawned before being processed.
- Weigh the whole animal (in grams) and record the weight.
- Scrape away the spines from the top (aboral side), bottom (oral side) and one side of the animal.
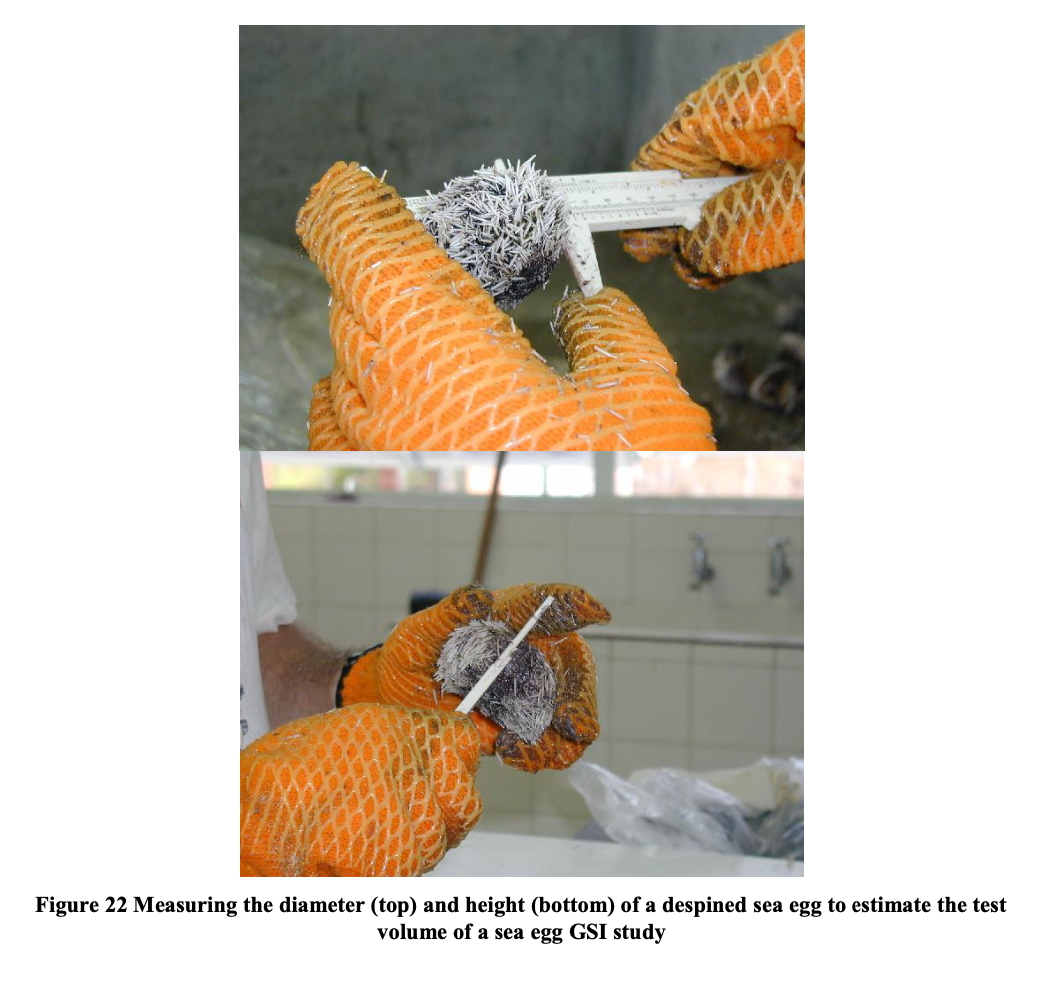
- Measure the diameter and height (figure 22) of the animal (in millimetres) using a vernier calliper by placing the instrument snugly against the test in the areas where the spines have been removed. Record all measurements.
- Crack the bottom of the test using a spoon and shake loose all of the internal structures leaving the gonads attached to the top inside of the test.
- Use forceps to gently remove any remaining tissue from the gonads.
- Note the condition of the gonad i.e. if they are firm or runny.
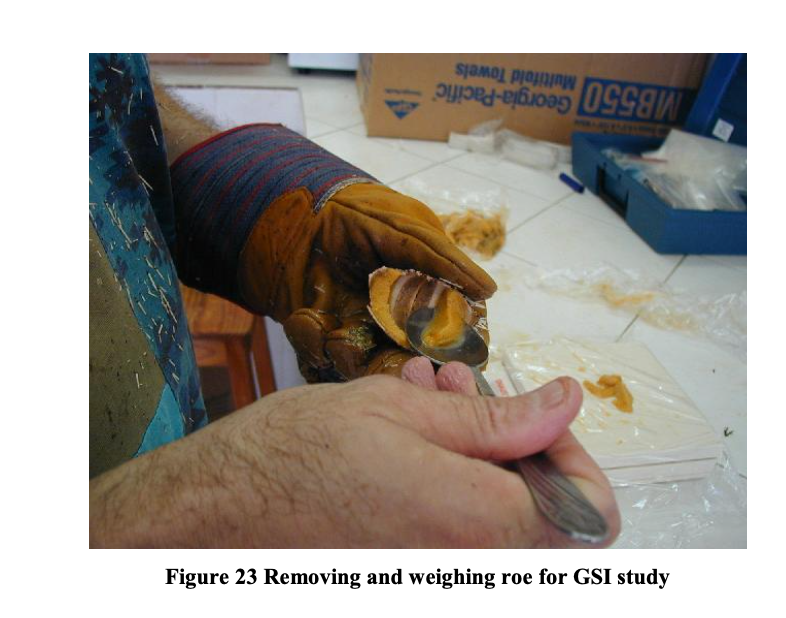
- Use a spoon to scrape out all of the five lobed gonad from each sea egg and weigh it (in grams)
- Record the weights along with the other data for each sea egg.